Find Us on Facebook!

Wednesday, August 31, 2011

Teriyaki Flank Steak

Looking for a healthy meal? But also one that has all the flavor? Well, this is it! When you think of frozen food, typically healthy and flavorful don't come to mind. This recipe will change your thinking, because this Flank Steak is DELISH! The key to freezer meals, is having fresh fruit and vegetables to add as side dishes. I love fresh food, so..... Yes. You can have fresh and frozen all in the same meal (although you aren't eating your meal frozen, duh!)


Teriyaki Flank Steak
Ingredients:
2.5-3 lb flank steak
1/4 tsp pepper
1/2 cup soy sauce
1 large clove garlic, minced
1 tsp ground ginger
2Tbsp brown sugar
2 Tbsp lemon juice
2 Tbsp veg. oil
1 Tbsp dried minced onions

Directions:
Put all ingredients into a gallon size ziplock bag, seal tightly getting all air out. Label/date and Freeze!

When ready to eat, thaw completely.

For grill: turn heat to medium/low. Cook on each side for 5-8 minutes done to liking.

For oven: heat oven to low broil. Bake on each side for 5-8 minutes done to liking.

Let meat rest for 10 minutes before slicing against the grain. Serve with grilled portabella mushrooms, corn on the cob, and spinach salad, or any of your favorite grilled veggies!


I have to share one more thing... Recently we went to Disneyland this summer. One of my favorite things I love to eat at the park is a Chili-Lime Corn on the Cob. As we were eating corn with this dish, I decided to replicate my own Chili-Lime Cob. This was an afterthought as I prepared dinner, so I went searching through my spice cupboard and sprinkled this and added a dash of that and, it was pretty darn close to the real thing. Except we ate sweet white corn instead of the typical yellow corn at the park. This was such a treat, I felt like I was right back in Disneyland with each bite!

Ingredients:
Corn on the cob
Butter (I use spray butter, don't hate me!)
2 tsp lime zest
1/4 tsp chili powder
1/4 tsp dried cilantro flakes

Directions:
Boil as many corn on the cob as you like. Spread butter on each cob, with a sprinkle of the lime zest, chili powder and cilantro flakes to liking.

Wednesday, July 20, 2011

Mom's cookies

I got this recipe from my mom, she is the author. I'm SOOO grateful, because they are mine & my husband's favorite. I try and keep this cookie dough in my freezer at all times (you know, when you need a "go to" dessert, friends are coming over and I have not prepared a darn thing, or just because I feel  like eating a cookie, RIGHT NOW!!)

I love to cook really yummy food, BUT....At heart, I am a dessert girl! (Hence the two posts today are desserts!) And I also really like cookies in the category of sweets.   My favorite cookie growing up that I made all the time was a peanut butter cookie. I still love those, but my mom's cookies are at the top now.


Christyn's Cookie Recipe

2 cubes butter, softened
2 cups brown sugar
1 cup sugar
4 eggs
1 cup veg. oil
1 T vanilla
2 tsp baking soda
1 tsp salt
4 1/2 cups flour
12 oz. pkg milk choc. chips
1 1/2 cups chopped pecans toasted
2 1/2 cups oatmeal

Cream together butter and sugar. Then add eggs, oil and vanilla to creamy mixture. Add dry ingredients, mix well and fold in the last three ingredients. Bake @ 375 for 9 minutes.

Enjoy, and just a warning, you might have to make a double batch, they go VERY fast! I have to keep the baked cookies in my freezer just so I don't pop them in like popcorn. YES...the warning is real!!

My Oreo Cheesecake


My infamous Oreo Cheesecake!! I made this for our Mother's day dinner this year. I pull this one out on holidays, otherwise it would be too dangerous to keep around!!!
CRUST:

2 cups oreo cookie crumbs (take out the filling of the cookie before you crush them in the food processor)
6 Tbsp. melted butter
4 Tbsp. sugar
FILLING:
5 pkg (8 oz. each) cream cheese, softened (or 2 1/2 lbs)
1 cup sugar
3 Tbsp. flour
1 Tbsp. vanilla
1 cup light sour cream
4 eggs
3 cups crushed oreo cookies
1 tube cream cheese frosting
12-15 whole oreo cookies for the top

DIRECTIONS:

Preheat the oven to 325 degrees. Mix crumbs, sugar and butter, press firmly onto bottom and up the sides of a spring form pan. Bake 10 minutes.
Beat cream cheese, sugar, flour and vanilla in electric mixer on medium speed until well blended. Add sour cream, mix well. Add eggs mixing on low speed after each addition just until blended. Stir in crushed oreos. Pour over crust. Bake 1 hour 10 min. or until center is almost set. Cool completely, keep covered in fridge for 4 hours or overnight until ready to frost, decorate and serve. Frost cake with cream cheese frosting and decorate with whole oreo cookies.
Makes 16 servings, one slice each. ENJOY!!

Thursday, July 7, 2011

Basil-Balsamic Pork Chops

Loved, loved, LOVED this meal!! With having lots of frozen meal options, I like to throw in the "fresh" to change it up. This summer we have been grilling 3-4 times a week, and I'm not complaining one bit! This meal consists of mouth-watering Basil-Balsamic Pork Chops, Basmati rice, grilled peaches & grilled pineapple. YUM! (You can go ahead and wipe the drool hanging off your chin, now!)


Makes 3 entrees, 4 servings each
12 pork chops bone in or boneless
1 cup olive oil
1/2 cup balsamic vinegar
1/4 cup lemon juice
2 tablespoons honey
3 teaspoons minced garlic
3 teaspoons dried basil
2 1/4 teaspoons black pepper
3 one-gallon freezer bags, labeled
1.  Rinse and divide chops evenly among the freezer bags.
2.  Whisk together olive oil, vinegar, soy sauce, lemon juice, and honey in a medium bowl.  Divide marinade evenly over the pork.
3.  Into each bag measure 1 teaspoon garlic, 1 teaspoon basil, and 3/4 teaspoon pepper.
4.  Seal and freeze.
Cooking instructions:
1.  Prepare a medium fire in a gas or charcoal grill.
2.  Cooks chops, turning occasionally, until an instant-read thermometer inserted into the thickets part of a chop reads 160.  Discard remaining marinade.

To make the grilled pineapple: skin the pineapple, the cut 1 inch thick pieces and sprinkle with sugar.

Grill on both sides.
Now for the peaches. I left the skin on, you can peel them if you like. Halve and pit each one. Then sprinkle with sugar on the flesh side.
Grill flesh side down til sugar is carmelized!
Right there is a grill full of summer!
Enjoy the plate filled with amazing flavors and textures!

Friday, July 1, 2011

Navajo Tacos

These were my kids' favorite finger food of the week! Sometimes its fun to pick up your food, throw out the fork at dinner time and lick your fingers clean!

Ingredients:
  • 1 lb ground beef
  • 1 onion, finely chopped
  • 1 can refried beans
  • 1 pkg. taco seasoning
  • 12 frozen Rhodes Rolls
  • lettuce, shredded
  • tomato, sliced
  • sour cream
  • shredded cheddar cheese
Directions:
Taco shell: Thaw the rolls and flatten with a rolling pin into a circle shape. Heat frying oil to 375. Drop in one roll at a time, flipping onto the other side when golden brown. Remove from oil when 2nd side is golden brown. Place on paper towel for oil to drip onto.

Filling: Brown the beef with the onion in a skillet on medium-high. Drain fat. Turn heat down. Add the can of beans and taco seasoning, mix well.

Fill each taco shell with the toppings of choice! Enjoy!!


Get ready to pile some goodness onto this thing!!
I put everything on my taco. Y-U-M-M-O!
My kids just like cheese and lettuce, but they ate the whole thing!

Wednesday, June 29, 2011

The best RED, WHITE & BLUE dessert!


Who doesn't love the 4th of July? We not only love to celebrate by wearing our country's colors, but we love to make all sorts of desserts with them, too! This Fruit Pizza has a few variations from the one I originally make. First, get a tube of cookie dough from the refrigerated section in the grocery store!! Yes, this is a VERY semi-homemade dessert!!

Press it out into a 9 inch cake pan...the WHOLE tube!! Bake at 350 for about 20-25 min, til the top is golden brown and it is set.

Let cool before you spread this goodness on! Here's the variation: instead of cream cheese, sugar, lemon juice & sour cream...I simply spread on pineapple flavored Greek yogurt!! It was the perfect texture and the chunks of pineapple gave it the flavor that the lemon juice would have provided.

Then pile on your favorite fruits with the colors red & blue! Even blackberries would have been a wonderful alternative! I cute up strawberries into bite size pieces, then layered blueberries and raspberries!

Dig in and enjoy! this one I could eat for every meal and not feel so bad.

Saturday, June 11, 2011

Pot Stickers & Yakisoba

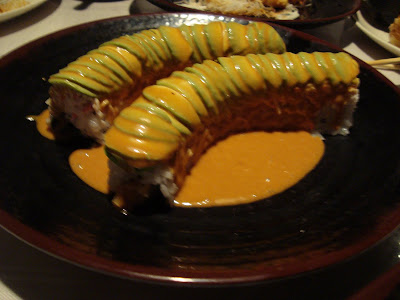
I am a lover of sushi. There. I said it. We ate at one of our neighbor sushi joints the other night and it inspired me to break out my Japanese cooking skills! This right here is making me hungry for more!


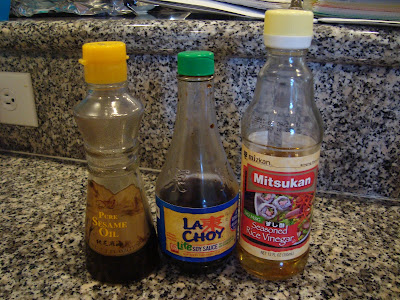
These three ingredients I ALWAYS have on hand...and you can make anything Asian-style!
  • Pure Sesame Oil
  • Soy Sauce 
  • Rice Vinegar

GOYZA
Ingredients:
·         1/3 cup chopped cabbage (boiled)
·         2 tbsps chopped green onion
·         1/2 pound ground pork
·         1 tsp sesame oil
·         1 tsp sugar
·         2 tsps soysauce
·         1/2 tsp garlic salt
·         1 tsp grated fresh ginger
·         20 gyoza wrappers
·         1 tbsp vegetable oil

*Makes 4 servings  (I ALWAYS double it because they are a hit at our house)
Preparation:
1. Combine all ingredients other than oil in a bowl and mix well by hands.

2. Place a teaspoonful of filling in a gyoza wrapper and put water along the edge of the wrapper by fingers.
3. Make a triangle, gathering the front side of the wrapper and sealing the top down to the edges. 

4.Heat oil in a frying pan. Put gyoza in the pan and fry on high heat until the bottoms become brown.

5. Turn down the heat to low. Add 1/4 cup water in the pan. 
6. Cover the pan and steam the gyoza on low heat until the water is gone.

You can't have goyza without a dipping sauce! It just wouldn't be right!  
Spicy Gyoza Sauce
  • 1/2 cup rice vinegar
  • 1/2 cup low-sodium soy sauce
  • 1/2 teaspoon crushed red pepper flakes
  • 1 garlic clove, minced
  • 1/2 teaspoon minced fresh ginger root
  • 1/3 cup thinly sliced green onions
  • 1 teaspoon sesame oil
DIRECTIONS
  1. Whisk together the rice vinegar, soy sauce, red pepper flakes, garlic, ginger, green onions, and sesame oil in a bowl; allow to sit 15 minutes before serving. Store in refrigerator up to 1 week.
I usually serve Yakisoba with the Pot Stickers. Yakisoba was a personal staple in my diet while I lived in Japan. I was thrilled to find it in the local grocery store when I came back home. Since I've introduced this to my hubby & kids, well, its been love at first taste.  (And YES, it is WAY better than chow mein noodles!)
To find Yakisoba in your local grocery store, go to the Asian section (usually where tofu is sold) or ask for help. Cooking instructions are on the package. Add your favorite vegetables. The usual vegis I put in vary; but aren't exclusive to: chopped cabbage, 1 sweet onion (halved & sliced), minced ginger, sliced celery, carrots, japanese eggplant, mushrooms, bean sprouts, scallions (for garnish), or anything else that may satisfy you.

Wednesday, June 8, 2011

Chicken Enchilada Casserole

New Mexican Enchiladas de Pollo en Cacerola (Chicken Enchilada Casserole)
My family liked this dish! With a bubbly layer of cheese on top and creamy corn tortilla & chicken on the insides, how can your kids not want to eat at dinner time??? I don't know about you but I always love that top crispy layer of cheese...Y-U-M-M-Y!  Since the weather has been pleasant, even for June, we have been enjoying our meals on the patio, which helps keep the crumbs outside for the birds to clean up after us! (yay for no mess in MY kitchen!!)
A little Spanish-style rice and some broccoli were complimentary sides to this scrumptious dish!


Baking Time: 30-40 minutes thawed
Temperature: 350°F

Ingredients:
2 cans (10 ounces) cream of mushroom soup

1 small can of chopped green chili **
1/2 cup milk

1/2 cup chopped onion (optional) **
1 1/2 cups shredded chicken* (a rotisserie chicken tastes best!)

1/2 teaspoon salt

1/2 teaspoon garlic salt

⅓ can Green Chili Enchilada Sauce (28 oz) **
12 corn tortillas
Shortening
cheese

Directions:
1. Combine mushroom soup, green chili, milk, onion, chicken, salt & garlic salt, 1 cup cheese and enchilada sauce
2. Heat 1/2 inch of shortening in a heavy pan at medium-high heat.
3. Quickly dip each tortilla into the shortening to fry and soften. Drain on
absorbent towels.
4. Grease pan with Pam and then layer with 6 tortillas. Put half of the sauce mix on the first layer of tortillas and then fry and layer the other six followed by the rest of the sauce mix.

5. Top with a cup of cheese.
6. Cover casserole dish and bake in a 350°F oven for 30-40 minutes or until sauce bubbles and cheese is melted.

* Twelve ounces of canned, drained chicken may be substituted.

** Varied amounts may be used.  Recipe Courtesy Danielle Fleming

Tuesday, June 7, 2011

Freezer Meal Guidelines

Welcome to Freezer Meals 101. We all have busy days, and with out planning ahead, well, dinner goes by the way side. So, get yourself a group of ladies together, whom you trust as friends AND as chefs (c'mon, who wants to get food poisoning from one of your best friends...cause she's not in the kitchen a whole lot?) Go over these rules, you can change them to your group's needs and....Viola! Dinner is served!

Guidelines:
·         Make and Freeze 10 Meals to exchange with our group. (or how ever many are in your group)
·         Try to spend around or below $80-$100 for all costs. If you shop sales, you may be able to spend substantially less.
·         Your meal should feed 6 adults. Please measure out AT LEAST 8-9 CUPS of food when dividing it into the ziplock bags, 9x13 pan, or whatever container you are placing your food in. This will ensure equal distribution and help keep the meals fair and equal. I know some recipes will be difficult because certain meals require a different type of assembling food. But we all want to make sure we are keeping it fair, and that we can enjoy some leftovers if our hearts desire it.  For example: If you have a main chicken dish, please use 6 breasts in each entree.
·         You will need to package your meal in either freezer bags or disposable aluminum pans.
(If your item is in a pan, please use a 9x13 disposable pan.)
·         Write on your package with permanent marker what the meal is, the basic instructions, and the date. Most meals will need to be pulled out of the freezer ahead of time so that it can thaw. Write the cook time that should be used once the meal is thawed.
Example
·         Name of your Recipe
·         Page # (if it’s in “girlfriends on the go”)
·         Cooking Temp
·         Cooking Time
·         Raw Ingredients enclosed (if there are)
·         Prepared by:_________, on (02/15/2010)
·         Serving Suggestions (side dishes or complimentary items)
·         Please only make meals that you and your family have tried and enjoyed.
DO NOT experiment on the group! Recipes in the “Girlfriends on the Go!” Are fine to use, they have been tried and proven.
·         ALLERGIES in our GROUP: NO Nuts. NO Fish or Seafood.
·         PLEASE Practice Proper Hygiene / Kitchen etiquette while preparing these meals, Clean Kitchen=Happy Tummies!! Keep Children and Pets away while preparing your meals, Clorox Wipes are good for Raw Meat spills and drips, wash hands consistently during your cooking time, keep hair pulled back if possible, etc….
·         If you are stumped about what to cook and what freezes well, consult “Girlfriends on the Go” Cookbook, there are MANY tips and tricks.
·         If you are making a Family Favorite (not from the book) Please type up your recipes on a full sheet of paper as well as suggestions for what vegetables or side dishes to serve with the meal, and your name on the recipe. We will be placing it in our binder.
·         We want everyone to have fun. Obviously your family is not going to love every meal, but hopefully they will enjoy the majority and that will make it all worthwhile. The most important thing is to take some stress out of your day so that you can spend more time with your family doing fun things, not cooking and cleaning!
·         Please bring your meals ALREADY FROZEN. Plan Ahead!! If you cannot make it to the exchange, please drop off the meals in a cooler (with ice) prior to the exchange. If you are not prepared, each person will keep their meal until you deliver your meal and pick up theirs from each group member. When we exchange we will tell about our dish. It shouldn’t take more than 45 minutes.

Good Luck on your freezer meal success. Now you can start enjoying your family more, get out of the kitchen, stop buying fast food for every meal, and heck, your bank account will thank you.

Jerk Chicken

This month for our Freezer Meal Group, I decided to do something on the grill! But for this dish, the grill is only for the smoke flavor, adding wood chips to give it that "um, um, good", "finger-lickin", "lip-smackin" kick! I found the chicken on sale (rather, my hubby found the chicken on sale...he is MUCH more dedicated and better at couponing and finding deals than I am!) As I determine what to do for my meals each month, I ask my hubby whats on sale and then we decide what would be best to cook! So, chicken sales=chicken meals!! I SHOULD have gotten a picture while it was on the weber, but it had the lid on....and I forgot!


Jerk Marinade:
  • 2 teaspoons allspice
  • 1/2 teaspoon ground cinnamon
  • 1/2 teaspoon ground nutmeg
  • 1/2 onion
  • 8 cloves garlic or 1 whole head
  • 1 (1-inch) piece fresh ginger, sliced
  • 3 scallions, sliced
  • 3 limes, juiced
  • Splash low-sodium soy sauce
  • 1/4 cup extra-virgin olive oil, plus more for drizzling
  • Kosher salt and freshly ground black pepper
  • 6 sprigs fresh thyme, leaves picked
  • 1 jalapeno pepper
  • 1 serano pepper, halved (only use half)
  • 1/4 cup packed light brown sugar
  • 1 whole free-range chicken (about 5 pounds), cut into 10 pieces
  • Limes, for garnish
  • Parsley, for garnish
  • Smoking chips, soaked in water for 15 minutes
  • * Liquid smoke (if you don't have a grill, you can certainly skip the grilling part with the smoke chips, add a touch of liquid smoke, a little goes a long way, and go straight to the oven!)
Directions
Begin by making the jerk marinade. Combine all the marinade ingredients in a blender and process until you have a smooth puree. **FREEZER MEAL TIP: I doubled the recipe each time so I only had to make the marinade 5 times to end up with  10 meals.

Add chicken pieces into a large resealable plastic bag and pour in the marinade. Put the bag into a baking dish and let marinate in the refrigerator overnight. **FREEZER MEAL TIP:  Pour half the marinade from the blender in, squeeze the air out, lay flat, label it and stick the other 9 meals in the freezer! How's that for swimming in the yummy jerk marinade?

When you are ready to cook, and your jerk chicken is completely thawed:

Preheat grill to high.

Prepare a table-top smoker or take a roasting tray, line it with foil and add some soaked wood chips to the bottom. Place a wire rack over the top, upside down, and lay chicken pieces over the chips on the rack. Cover with foil and grill over high heat. Smoke for 10 minutes.

Preheat oven to 300 degrees F.

Transfer the chicken pieces to a baking sheet and drizzle with extra-virgin olive oil. Bake in the oven "low and slow" until chicken is tender, about 1 hour. Remove the chicken from the baking sheet to a serving platter and garnish with limes and parsley before serving. Since it was just my little family, I skipped the serving platter to save on dishes! And yes, we ate this on paper plates...hey, anything is better than doing dishes after dinner!